Hilde's Garden
Saturday, May 21, 2022
Friday, May 20, 2022
Water your plants while away
How to water plants while away.
Take a small or large plastic bottle, depending on the size of your plant and pot.
Drill 2-3 holes at the bottom of the plastic bottle and 3-5 holes on the sides.
Dig up the soil nearby the plant without disturbing roots and deep enough to bury the bottle in it up to the neck.
Fill the bottle with water and put it in the hole you just made, and then level the soil nearby the hole by tapping it. If the plant doesn’t require much water, place the cap; otherwise, leave the bottle uncapped.
Saturday, April 16, 2022
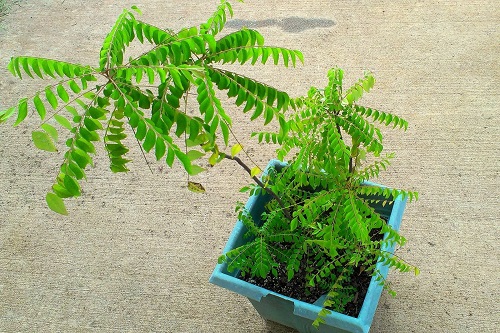
Grow curry leaf plant from cuttings
Growing Curry Leaf Plant from Cuttings
- Snip off 8-10 inches long cutting from a healthy curry tree.
- Remove the bottom leaves, dip the end of the cutting in a rooting hormone, and plant it in a container filled with a potting mix.
- Water well, cover, and place the pot in the shade.
- After 10-15 days, you will notice the growth of new shoots.
- Once it starts to show good growth, acclimate the plant to a sunny area.
Growing Requirements of Curry Leaves
Sunlight
Make sure any building or tall tree is not obstructing the plant. If you plan to grow it indoors, opt for a south-west window.
Water the soil uniformly and deeply when the topsoil feels dry to touch. Avoid watering too much and never let the plant sit in soggy soil for too long.
Soil
Curry leaves plant prefers loose, aerated, well-draining, and slightly acidic soil for optimal growth. Though it can adapt well to any Indian soil, it should be planted in sandy, loamy soil amended with well-rotted manure or compost. For containers, a quality potting mix will do the trick.
Climate
The plant is well adapted to the subtropical climate of India; hence it can be grown easily. However, it doesn’t respond well to the freezing winters, especially if the temperature drops below 4 C. If you are growing it in containers in hilly areas, move the plant inside during the harsh winters.
Pot Size
The plant will do well in any medium-sized pot. Go for terracotta pots as they offer good air circulation in the roots, thanks to their porosity. Make sure that the pot has ample drainage holes to let the excess water out.
Curry Leaf Plant Care Tips
Fertilizer
You can feed the plant with a diluted balanced fertilizer once in 3-4 weeks. Homemade fertilizers like rice water, eggshells, buttermilk, or well-rotted cow manure also work well.
Re-Potting
If you are growing the plant in a container, re-pot it every 2-3 years, as the plant becomes root-bound. Go for 1-2 size bigger pot than the previous one and use fresh potting mix.
Source: India Gardening
Coconut bird house/feeder
COCONUT BIRD HOUSE
NEEDED:
STEP 1:
STEP 2:
STEP 3
Trellis vertical garden
Install a trellis for your vegetable plants to grow on. You’ll have a beautiful vertical garden full of fresh produce to enjoy.
Vegetable tunnel
Birdseed Bells
MATERIALS:
- 1 cup Birdseed
- 1/2 cup Black Oil Sunflower Seeds
- 1/4 cup Cornmeal (or Flour)
- 1 teaspoon Unflavored Gelatin (about half a packet)
- 1 tablespoon Light Corn Syrup
- Additional Tools:
- 4.3" Clay Flowerpot
- 24" length of yarn or string
- Wax Paper
INSTRUCTIONS:
- Prepare the clay flowerpot by lining it with wax paper, and then poking through the wax paper at the bottom with a pencil, and out the hole in the bottom of the pot.
- Fold the 24" length of yarn or string in half and push the folded end through the hole in the bottom of the pot, pulling it through until about a 4" loop is sticking out of the bottom of the pot.
Birdseed mixture.
- Mix the birdseed, sunflower seed, and the cornmeal (or flour) in a mixing bowl and set aside.
- Measure your 1/4 cup of water in a glass measuring cup. Heat the water just a bit in the microwave (about 30 seconds - you want it hot enough to dissolve the gelatin).
- Mix the teaspoon of unflavored gelatin into the hot water and stir to dissolve.
- Next, add the tablespoon of light corn syrup to the gelatin mixture.
- Pour the gelatin mixture into the birdseed mixture and stir until everything is well mixed.
- Spoon the birdseed mixture into the prepared mold, holding the string up straight as you spoon the mixture around it. Pat the mixture down a bit once it is all in the flowerpot mold. You should have a few inches of string still sticking out when you are done filling the mold.
- Put the filled mold in the freezer for about an hour to harden up.
- Then remove from freezer and pull up on the wax paper to remove the bell from the mold.
- Carefully pull any remaining wax paper away from the bird bell and discard.
- You may then want to let your birdbell set for about a week to thoroughly harden and dry. This will keep the string hanger from pulling out. If you would like to hang your birdbell before then, you can tie a washer onto the string ends hanging out under the birdbell to make the bottom more sturdy. Trim any remaining yarn pieces under the bell as needed.


